Image Hosting
Host Providers
Since the crash and burn of Photobucket, many Petz Community members switched to other image hosts. Image hosting is an essential part of interacting on forums, as most will not allow (or frown upon) 'attaching' images to your posts. Plus, it's always nice to see an image show up just the right size, with no extra clicking or downloading needed.
Up top is a list of a few of the most popular image hosts. Below that is a tutorial for using Amazon S3 (my personal choice). At the bottom is a "How-To" on posting an image in a forum.
Imgur
I think many people use imgur because it was the next most-popular host at the time Photobucket crashed. It's not a bad option but I'm an organizational control freak and I don't like how you can't really sort or organize all your uploaded images very well. PLUS, the automatic renaming of "RhapsodyStables.png" to "0fgvpb3i.png" is a deal-breaker for me. I like to be able to look at the url for an image and know what image it is... However, imgur works just fine for other people and they're cool with you using them as an image host as long as it's NOT for avatars, banners, logos, advertisements etc., but most petz-related things should fly under the radar. Just make sure you always keep the images/albums private so the imgur community won't stumble upon them while they browse.
ImgBB
I've used these guys here and there when I just wanted to quickly upload an image or two, get the links, and then never come back. I've never bothered to create an account or check our their organization options. They do randomize the name of the image just like imgur does, and just like Postimages below, their BBC forum code is a big advertisement, so just use the direct link and add your own forum code.
Postimage
My least favorite but it's included because it's somewhat popular. I've had images removed/expired when I definitely never set them to, and again, I'd prefer more organization.
Another annoying thing is that if you use their premade forum code, which looks something like this: [url=https://postimages.org/][img]https://i.postimg.cc/kBgrccQr/image.png[/img][/url] then your entire image just became one big link back to them. My computer is a bit old and it strongly dislikes scrolling down a forum page with multiple giant links. So, if you DO choose these guys, please make sure you're posting just the image and not a backlink with it.
Amazon S3
Alright, be prepared for something a little different. Amazon S3 is free for 1 year (unless you use like A LOT of storage or link your pictures to THOUSANDS of people). However, after the one year, you might end up paying a couple cents a month. I'm no longer on the free period and I paid 1 cent last month and I've got some larger items stored, like 10-minute videos and high-quality photos, as well as lots of my website and all my petz images. If I removed some of the larger stuff, they wouldn't even bother to charge me for what I use and it would still be free.
I just figure, most likely, we are adults with a debit card and can afford maybe a couple cents a month. So if you're interested in perhaps hosting more than just images, like a website, or you want to be able to host images with a custom domain you might already own (I use images.jewellz.net), or you just want to be able to organize the crap out of your images and not have their names be a bunch of gibberish, this is for you.
Cost Breakdown
Amazon only charges you for exactly what you use each month.
I'll list their current prices so you can see how cheap it is.
You pay $0.023 per GB of storage, up to 50TB. That is 2 cents a month for each GB you have just sitting in storage.
You pay $0.005 per 1,000 PUT, COPY, POST requests (basically 1 request every image you upload).
You pay $0.004 per 10,000 GET requests (1 request every time someone loads an image).
So, let's just say you've got .25GB in storage (that's a lot of petz photos) and you uploaded 500 that month and posted a bunch of them on various popular petz forums, so you got like 10,000 GET requests from people (including you) loading them. You would pay 1 cent. $0.006 from storage, $0.0025 from uploading, and $0.004 from the GET requests.
There is also a budget section included in the Amazon service so if you are worried about some insane charges or something, you can set a limit on your spending, like $1, and Amazon will alert you when you get to like $.80 so you can then go in and see what's happening and remove stuff if you need to.
Creating an Account
Go to Amazon AWS.NOTE: ALL of the following links are to images! I just didn't want this to be too image heavy.
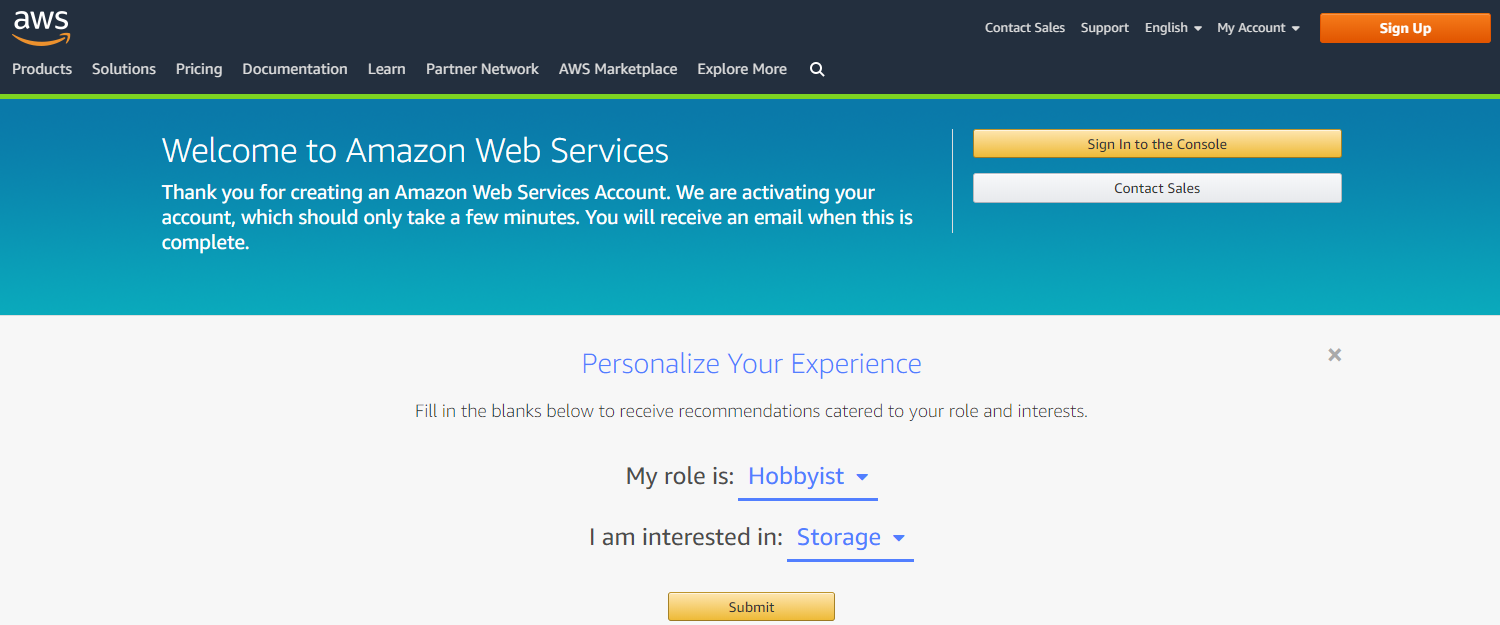
Create an account. I dredged up an old email address to set this up. You DO NOT have to have an Amazon.com account but if you do, you can just use that and it should pull in your contact and payment info for you.
Put in contact information, then payment information. You will NOT be charged for anything for the first year unless you do some insane uploading and linking to stuff.
Confirm your identity with a text message code real quick.
Select the basic support plan. Free is good.
And now you are signed up! Wait a minute and then log in. (You don't need to open or do anything with the email they send.)
Now it's time to log in and get started creating a space to upload photos.
Creating a Bucket
When you log in for the first time, you'll be on the console for ALL of AWS, but we are only going to use their storage service called S3. If it doesn't appear in the list, type it in the search box. Otherwise, click on S3.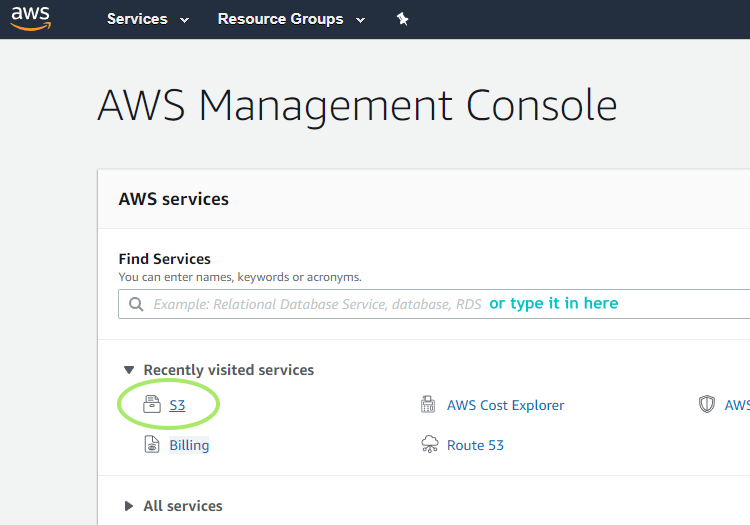
Recommendation: I bookmark this url, which allows me to quickly access S3: https://s3.console.aws.amazon.com/s3/
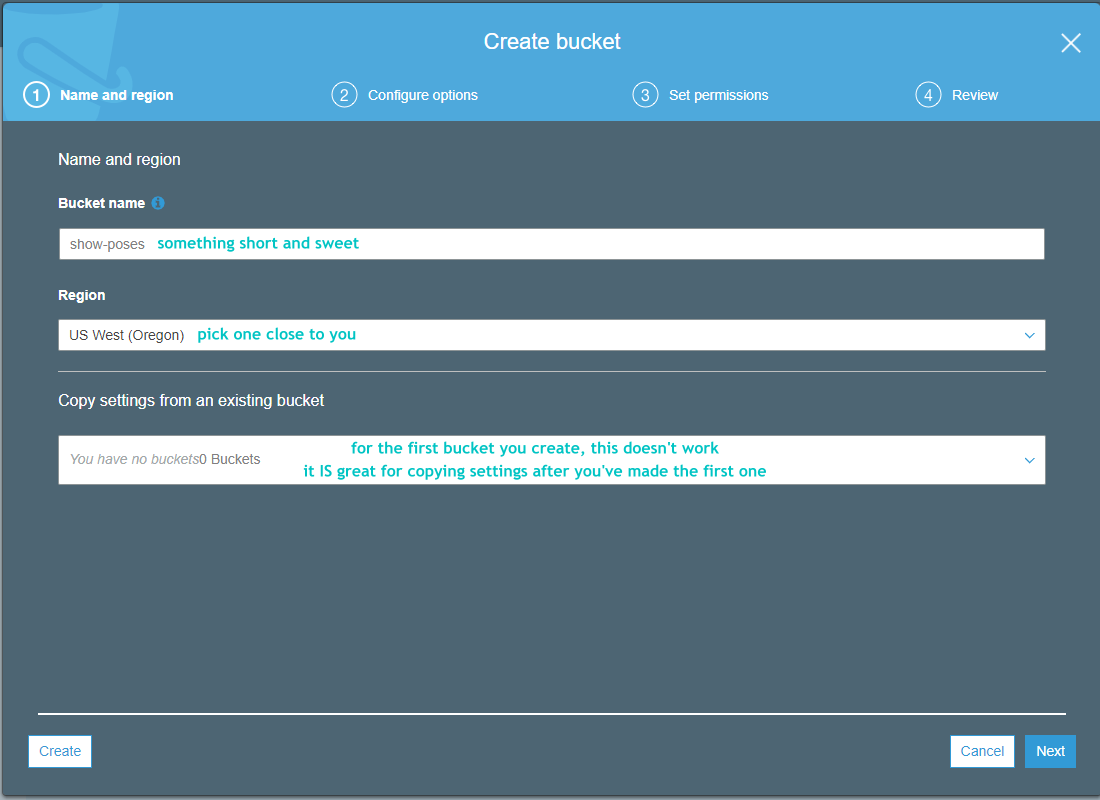
Once you're in S3, go through the setup process for your first bucket. Name your bucket something short and memorable, perhaps your forum username. It will be part of the url for all of your images! It also must be unique to the region you select, so, sorry, but I don't think anyone else in the Oregon region can use "show-poses" now.
You can select a region or leave it as whatever popped up, but it's recommended to pick one close to you. There are only 4 regions in the US so it's not a big choice.
Configure the bucket options. Leave everything as default settings.
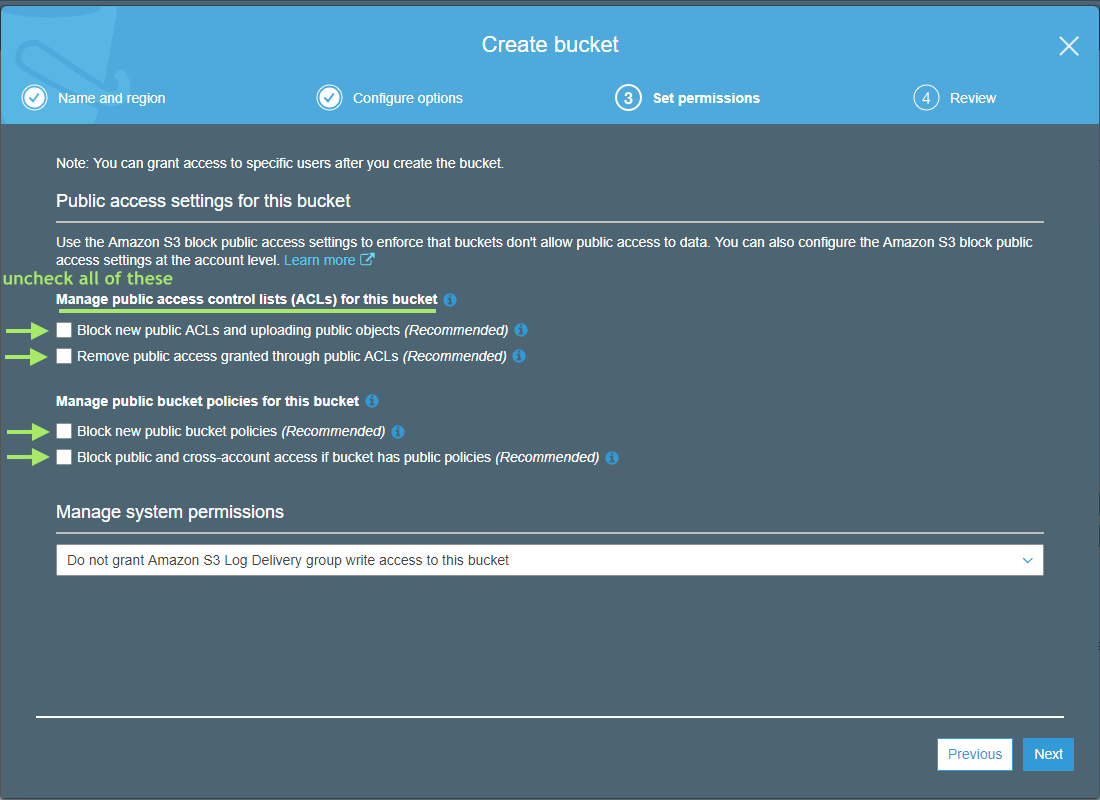
Next, you set the public access settings. Amazon, by default, wants to lock down the buckets and all the objects in them (images, files, etc.) because it's geared more towards storing things than sharing them. We want to be able to share everything so uncheck all the boxes!
Review everything to make sure it's correct, then create your bucket!
Once created, you should see your bucket. Also, make sure that the Access shows "objects can be public" so that you can set your images to be viewable by the public. Otherwise, only you can see them.
You can create multiple buckets to organize your objects (images), but I'd also like to note that you can create folders within a bucket as well, if you wanted to sort your images a bit. I myself use two buckets, one for my website and one for images. Within both of those buckets I have many folders to keep things more organized.
Uploading Images
Click on your newly created bucket and hit upload or get started.You can drag and drop multiple images or browse through your computer.
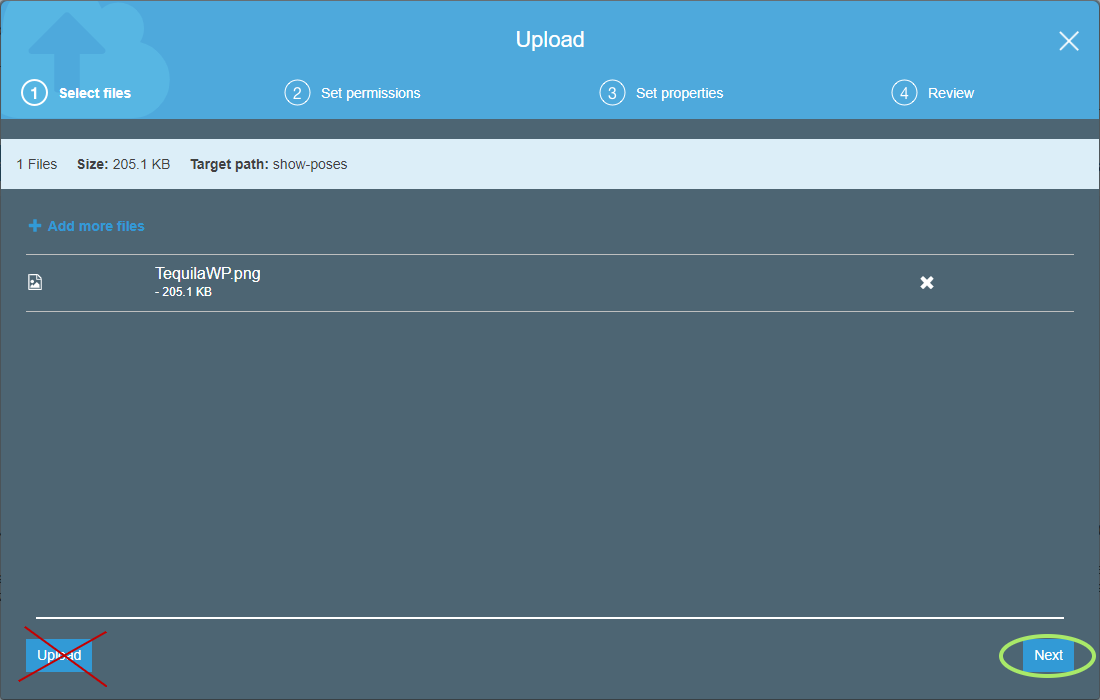
I'm going to upload a pose from Tequila for an example. I'd like to note that it is helpful if you click "Next" instead of "Upload" once you have selected the image(s) so you can set their public access, but there are also other ways to do that after they are uploaded.
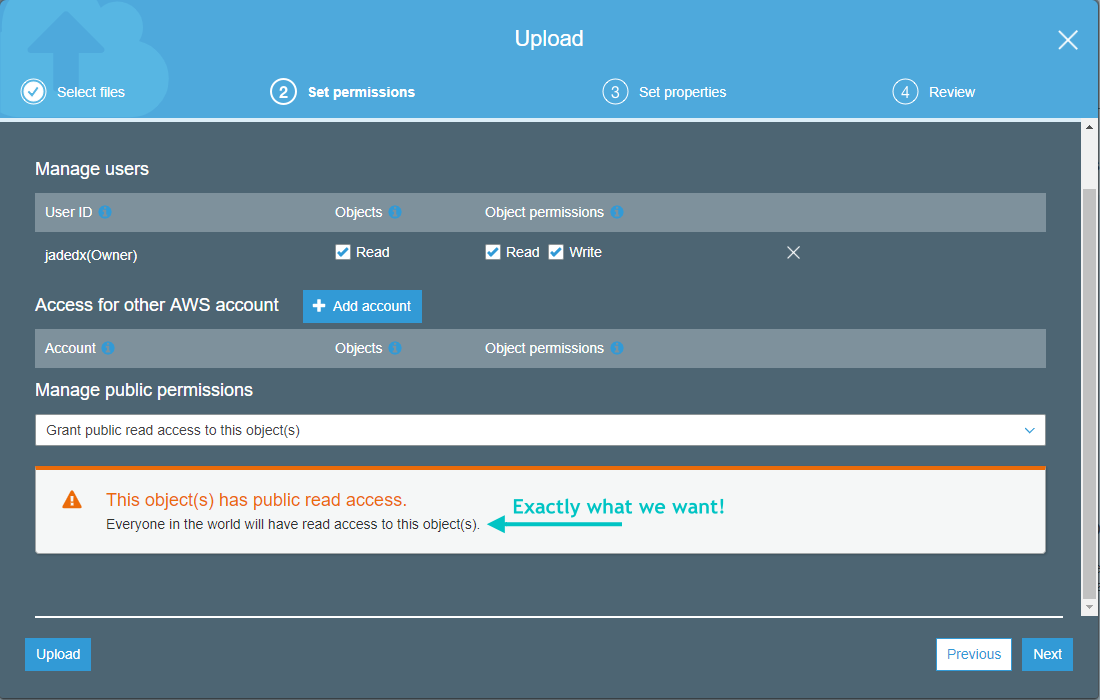
If you click "Next" rather than "Upload", you will be able to manage public permissions for the image(s). Use the dropdown menu to select "Grant public read access to this object(s)".
Amazon will have a warning that EVERYONE can see this object now. Don't worry, that's exactly what we want!
Select the standard/default storage class properties. Review everything and hit "Upload".
Now, your image(s) will show in your bucket!
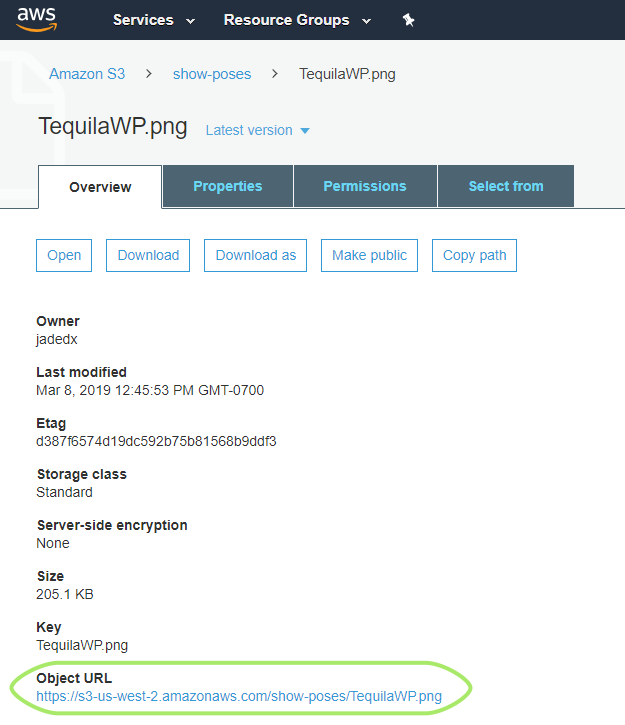
Your image is now uploaded and you'll need a link (url) for it so you can post it in the forum for everyone to see!
You can find it in two ways, check the box next to the image and a popup will display the url, or click on the image in the bucket list. Right-click the url and 'copy link address'.
Paste the url into a new page or tab in your browser and see if the image loads. If it doesn't show up, then you probably didn't set it as public when it was uploaded. Don't worry, we can easily fix that!
To Fix: If everything in your bucket is meant to be public (they're all images you want to share) then you can select all the objects in the bucket (or just select the one you want) and use the dropdown 'Actions' menu and hit "Make public". You could also click on the image and hit the "Make public" button.
Once the image is public, anyone with the url can see it and you can post it in forums. Hooray!
How To Post an Image
Okay, so your image is uploaded and you have the url for it. Here's how to post it in the forum so everyone can see it - full-sized and no weird links or anything attached!
Most forums have an "Insert Image" button somewhere.
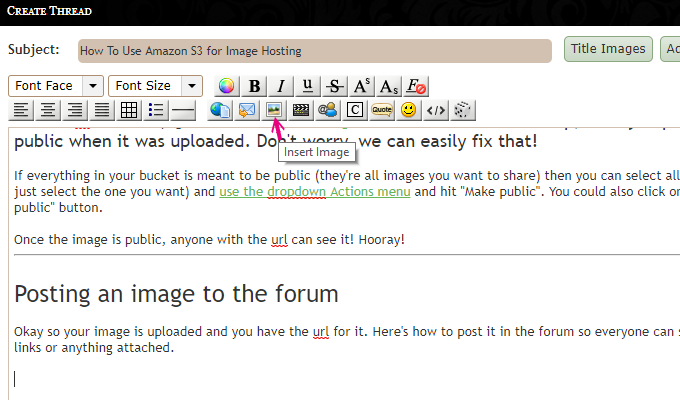
Use that, and all you do is paste the url in. Don't worry about alt text, leave it blank.

If there is no handy 'insert image' button, you can also copy/paste the following code: [img src="HTTP FULL URL HERE"]
and then copy/paste the url into it, so the code looks like: [img src="http://s3-us-west-2.amazonaws.com/show-poses/TequilaWP.png"]
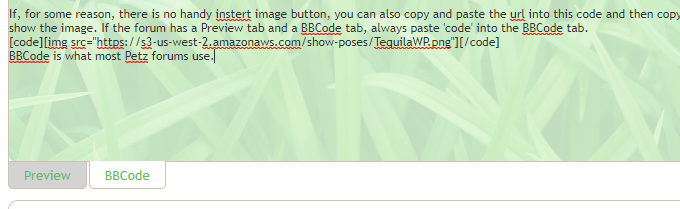 If the forum has a Preview tab and a BBCode tab, always paste into the BBCode tab! Otherwise, you could end up with ugly, double-spaced looking posts.
You can change the forum default to be on the BBCode tab in your forum profile settings, if you want. I'm constantly pasting in showing forms with code, so I always have BBCode as default.
That's all! Thanks for reading, and Tequila would like to show off her spiffy getup...